In my latest post I created a 6-image Panorama that was stitched together in Adobe Photoshop. I was asked to do a tutorial on Panorama creation in Photoshop, so here goes.

Before we start creating a Panorama in Photoshop, we'll have to get the images first, obviously. There are a few simple rules when shooting for a Panorama image:
1. Shoot Vertical: If you stitch together many horizontal images you'll end up with a long string of images that won't really look good. Shooting vertical makes more sense, because that way the Panorama will look more natural in the finished product.
2. Shoot Manual: This is important. You need to make sure, that exposure, aperture and shutter speed are the same in every image. This means shooting in Manual Mode since, that's the only way you can guarantee that everything will look right. If you manage to get equal looking images another way, than by all means do it. The thing is, they have to look the same (for example: same brightness in the sky, etc.)
3. Be fast: Once you set everything up, go ahead and shoot the images. Don't wait to long, because, for example, if it's a windy day, lots of things can move which will cause irregularities in the finished Panorama.
4. Overlap: Make sure that every image that follows, overlaps the same view from the previous one. That way Photoshop will have a better time stitching everything together. Don't allow gaps in space between images.
Now let's go ahead and create that Panorama.
click on the images to open up the screenshots for a better view
Step 1:
Open Photoshop and click on File > Automate > Photomerge

Step 2
Click on "Browse..."

Step 3
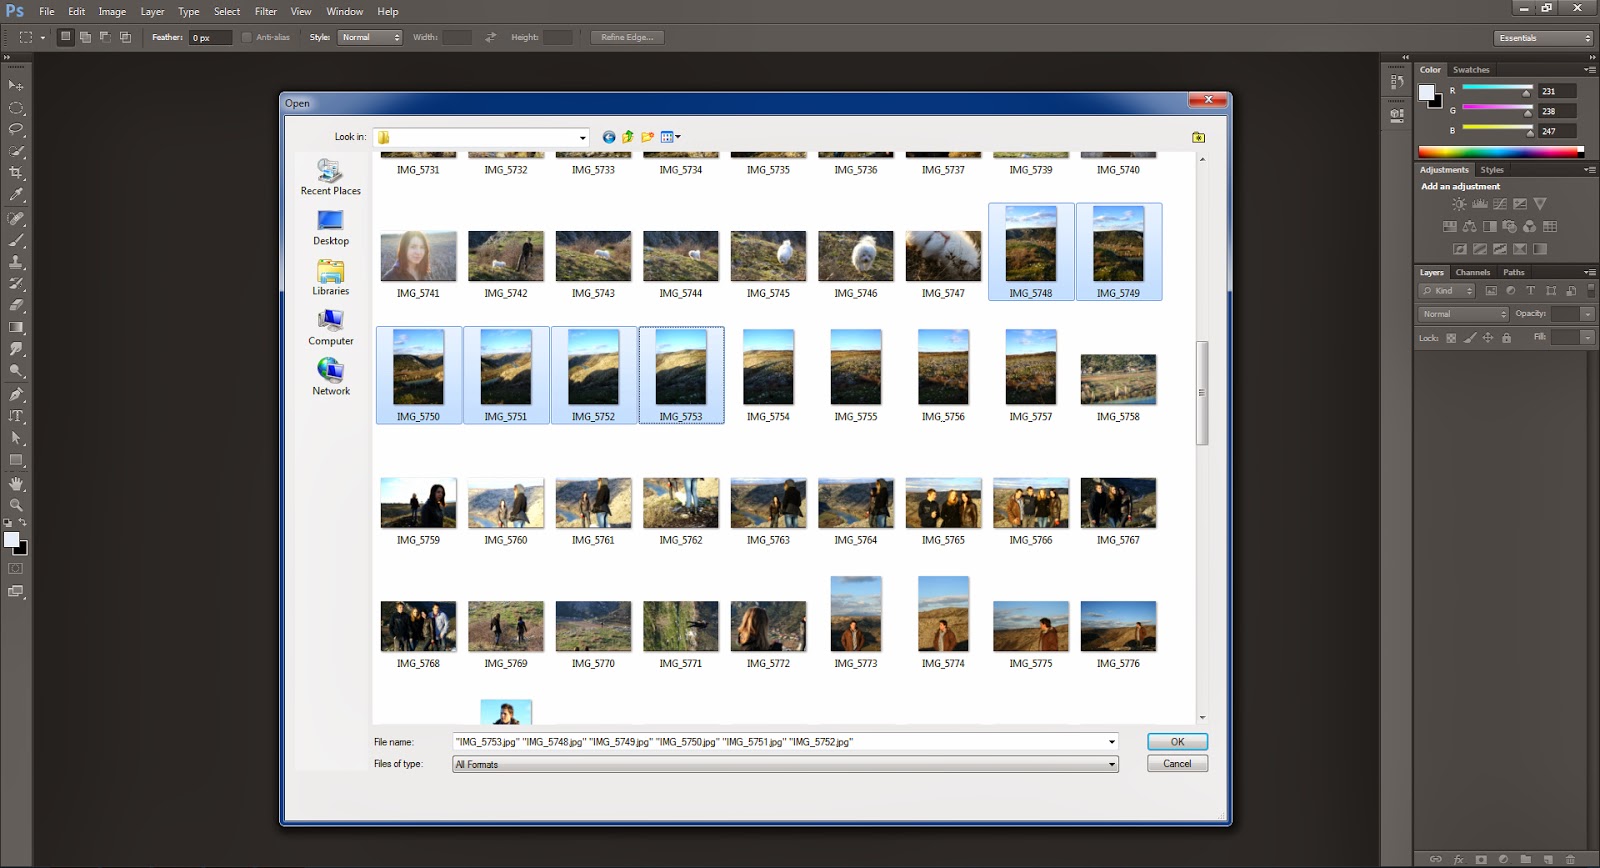
Search for your images
Once you find the folder click and hold down "Ctrl" on your keyboard and with your mouse select the images. You can also click and drag over the images. Once you find them click OK.
Step 4
Choose a Layout
I always use "Auto" and let Photoshop do the rest. It's selected by default. Click OK, and give Photoshop some time to calculate the Panorama. How long you'll wait depends on your PC and the amount of images in your Panorama.

After Photoshop is done you'll get something like this:

Step 5
Crop, rotate and tweak
Use the crop tool and select the Panorama to your desire. Once your done, you can tweak it further by rotating.

Step 6
Adjust color (Optional)
In this particular case I used my own tutorial on adjusting daylight images to tweak the shadows and colors.

Step 7
Save your image
File > Save As
And here is the end result:

I hope you liked this tutorial. If you have any further questions please let me know in the comments below.

![Going to Sleep [New Timelapse Video]](https://blogger.googleusercontent.com/img/b/R29vZ2xl/AVvXsEjS0TjW0eMR-3b5FR1pHz82QgdoV3Aqe5DVPfWOU0xvGq7z_8ODfOmgknXcg-S1sTjvaGaODzSqqDSYdyw9z1adoNBC-XB2gCv2GFzlbKtveDl3PLmWseVjo4o7RIy-1ucl-PWDK4E0f8A/s70-c/IMG_32.jpg)


0 comments:
Post a Comment
Click to see the code!
To insert emoticon you must added at least one space before the code.